Hello FPGAmigos! Last time, we embarked on a small project for some fun. However, fun during design is often marred by bugs, and an unverified design won’t get us far. So today, we’re going to explore how to create a testbench in Chisel3.
A testbench is software that runs against a software model of your design. Fortunately, since Chisel3 is embedded in Scala, we can write our testbenches using a full-featured programming language! Take that, VHDL/Verilog 😛
This will serve as a quick overview of how to create your testbench in Chisel/Scala, especially since a cocotb series of tutorials is in the works. If you wish to dive deeper into Chisel3, I highly recommend you the excellent ebook Digital Design with Chisel by Martin Schoeberl.
The design
Today we have two modules. A full adder:
class FullAdder extends Module{
	val io = IO(new Bundle{
		val a    = Input(Bool())
		val b    = Input(Bool())
		val cin  = Input(Bool())
		val sum  = Output(Bool())
		val cout = Output(Bool())
	})

	io.sum := io.a ^ io.b ^ io.cin
	io.cout := (io.a & io.b) | (io.cin & (io.a ^ io.b))
}
And a generic AdderNBits usingthe full adder above:
class AdderNBits(n: Int) extends Module{
	val io = IO(new Bundle{
		val a   = Input(UInt(n.W))
		val b   = Input(UInt(n.W))
		val sum = Output(UInt((n+1).W))
	})
	val adders = Array.fill(n)(Module(new FullAdder))
	val w_sum  = Wire(Vec(n+1,UInt(1.W)))

	adders(0).io.cin := 0.U
	w_sum(n) := adders(n-1).io.cout

	for(i <- 0 until n){
		adders(i).io.a := io.a(i)
		adders(i).io.b := io.b(i)
		w_sum(i) := adders(i).io.sum
	}

	for(i <- 0 until n-1) {
		adders(i+1).io.cin := adders(i).io.cout
	}
	io.sum := RegNext(w_sum.asUInt)
}
I know I haven’t introduced class parameters (the “AdderNBits(n: Int)”) yet, but that’s for a future post.
One interesting point I stumbled upon was the necessity of creating “w_sum”. In the first version that didn’t work, I proceeded as follows:
// i was doing this, and it don't work
io.sum(i) := adders(n-1).io.cout
io.sum(i) := adders(i).io.sum
// instead of
val w_sum  = Wire(Vec(n+1,UInt(1.W)))
//...
w_sum(i) := adders(i).io.sum
//...
w_sum(n) := adders(n-1).io.cout
//...
io.sum := RegNext(w_sum.asUInt)
But why doesn’t it work? I’ll give you a moment to think…
The reason is that bits in UInt are read-only and can’t be assigned independently. Thus, I had to create a Vector of n wires, each 1 bit long, to manage the bits separately, and then cast it as a UInt in io.sum. The error message wasn’t particularly clear, and that’s a point which is starting to bother me with Chisel. The error messages aren’t always helpful. For a simple design, it’s manageable, but for larger or professional projects, it can lead to significant time wasted. I have updated my Chisel Types and Operators article to include this information.
By the way, here’s the last line of the design. It’s not crucial for today since we won’t be synthesizing the design.
object Main extends App{
    (new chisel3.stage.ChiselStage).emitVerilog(new AdderNBits(4),  Array("--target-dir", "build/artifacts/netlist/"))
How to do a TestBench in Chisel ?
Environment
I’m still working with the workflow described in From HDL to FPGA Bitstream with Open Source Toolchain. Today, we’ll be adding what’s necessary to create a testbench.
The code for this article is available on my github page. If you don’t follow my workflow you can jump to the “The Tesbench” section.
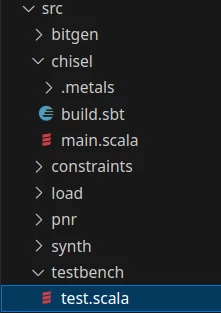
First, within the “src” folder, we’ll add a “testbench” folder, accompanied by a “test.scala” file.
Then I added the test command in the MakeFile:
test: src/testbench/test.scala
	docker run -v $(PWD)/src/chisel/build.sbt:/project/build.sbt \
	-v $(PWD)/src/testbench/test.scala/:/project/src/test/scala/test.scala \
	-v $(PWD)/src/chisel/main.scala:/project/src/main/scala/main.scala \
	-v $(PWD)/build/logs/:/project/build/logs \
	-v $(PWD)/build/artifacts/test/:/project/test_run_dir \
	-w="/project/" \
	chisel /bin/bash -c "sbt test > ./build/logs/test_log.txt 2>&1"
For those wondering where to find the Dockerfile for Chisel, refer to my How to Install Chisel with Docker article and the From Chisel to Bitstream guide.
The three key modifications are:
- Adding the test to the correct path so that sbt can locate the test.
-v $(PWD)/src/testbench/test.scala/:/project/src/test/scala/test.scala \- Creating a volume to get the simulation artifacts like the .vcd file to look at the waveform
-v $(PWD)/build/artifacts/test/:/project/test_run_dir \- Since you always want to know the result of you test, I put them in a log file
chisel /bin/bash -c "sbt test > ./build/logs/test_log.txt 2>&1"Otherwise they are the same line than the “make netlist” described here
Now we have eveything we need to run our test… except the testbench.
The testbench
To author our test, we’ll utilize ChiselTest, which is built upon the standard Scala test library, scalatest. Thus, there’s no need to modify the build.sbt, as we already possess everything we require.
Let’s begin by importing the necessary packages in the “test.scala” file:
import chisel3._
import chiseltest._
import org.scalatest.flatspec.AnyFlatSpec
Let’s declare our Class test:
class AdderNBitsSpec extends AnyFlatSpec with ChiselScalatestTester {
}
Behavior Driven Developpment
AnyFlatSpec is a part of the scalatest library and offers a method to describe tests in a “behavior-driven” style. Behavior Driven Development (BDD) is a workflow style popularized in the web domain, where you write your specifications in a pseudo-language understandable even by non-technical individuals. The most well-known pseudo-language for this is Gherkin, used by the Cucumber tool in web development.
BDD is an evolution of Test Driven Development (TDD). In TDD, you write your test first, run it, ensure that it fails correctly, and then write the function until the test passes. BDD follows the same philosophy but includes an additional step: writing your specification before the test.
BDD is an excellent way to involve a broad range of stakeholders, including managers, designers, testers, clients, etc. It’s a significant advantage that it’s natively available in Scala. This is another plus for EDSL (Embedded Domain Specific Language) in our field; we benefit from all the packages and community efforts of the host language.
In summary, BDD is fantastic. Embrace it if you aim for best practices and high-quality code.
Here’s the specification using AnyFlatSpec:
class AdderNBitsSpec extends AnyFlatSpec with ChiselScalatestTester {
    for(n <- 1 to 8){
        "AdderNBits" should s"correctly add two $n-bit numbers" in {
        ...
        }
    }
This line clearly states what the test is intended to examine and is understandable even by your manager. I promise, he/she can grasp it! :p
"AdderNBits" should s"correctly add two $n-bit numbers" inChiselScalaestTester
ChiselScalatestTester is a mixin trait offering functionality for testing Chisel circuits within the scalatest framework. By extending your test class with ChiselScalatestTester, you integrate methods and features enabling testing of Chisel modules within the scalatest milieu.
- Mixin Traits: In Scala, constructs like extends AnyFlatSpec with ChiselScalatestTester demonstrate mixin traits. A trait in Scala resembles an interface in other languages but allows for included implementations. Utilizing the with keyword lets you incorporate multiple traits into a class, facilitating a kind of multiple inheritance.
- ChiselScalatestTester Features: When you extend ChiselScalatestTester, methods such as test become accessible, permitting instantiation and interaction with a Chisel Module. This test method organizes the simulation setting, establishes the module, and offers a context where you can poke (input values), peek (retrieve outputs), and step (progress) the clock.
- Internals: Using test, the ChiselScalatestTester manages the initiation of the simulation environment, which might utilize a software simulator (like Treadle) or connect with external tools (e.g., Verilator). It conceals the intricate specifics of simulation, allowing you to concentrate on test crafting.
- Integration with Scalatest: As ChiselScalatestTester is tailored to function with scalatest, your Chisel evaluations can flawlessly merge with other Scala tests. This integration uses the same test runner and reaps the advantages of the extensive features scalatest provides, such as matchers, assertions, and reports.
The Test
test(new AdderNBits(n)).withAnnotations(Seq(WriteVcdAnnotation)) {dut => ...}Declare the test and instantiate the DUT (Device Under Test) using “new AdderNBits(n)”. The value for “n” is sourced from the for loop mentioned earlier. This is because I aim to test whether my adder can be employed to add unsigned integers ranging from 1 to 8 bits.
class AdderNBitsSpec extends AnyFlatSpec with ChiselScalatestTester {
    for(n <- 1 to 8){
        "AdderNBits" should s"correctly add two $n-bit numbers" in {
            test(new AdderNBits(n)).withAnnotations(Seq(WriteVcdAnnotation)) {dut => ...}
The “test” function is used to declare the test.
The “.withAnnotations(Seq(WriteVcdAnnotation))” is what you should include if you wish to dump a VCD file and examine your waveform. By default, Chisel creates a “test_run_dir” at the root of your project. In my Docker container, the test artifacts are generated in /project/test_run_dir. This explains the Docker volume used to retrieve them post-simulation in the makefile:
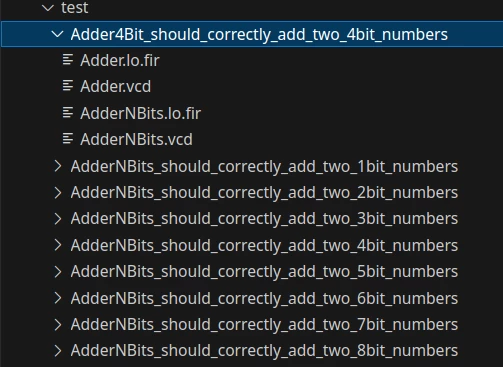
-v $(PWD)/build/artifacts/test/:/project/test_run_dirFor each test, a folder is created, named after the AnyFlatSpec statement. Since I tested my AdderNBits for unsigned integers ranging from 1 to 8 bits, I have 8 folders.
The test core:
{dut =>
	for (a <- 0 until Math.pow(2,n).toInt) {
		for (b <- 0 until Math.pow(2,n).toInt) {
			dut.io.a.poke(a)
			dut.io.b.poke(b)

			println("==========")
			println("a = " + a.toString )
			println("b = " + b.toString )
			println("==========")

			dut.clock.step()

			val result = dut.io.sum.peekInt()
			println("==========")
			println("result = " + result.toString)
			println("==========")

			assert(result == a+b)
		}
	}
}
The strategy involves testing every possible scenario. For a basic design like this, it’s feasible.
- {dut => …}: This is a Scala lambda (an anonymous function) that accepts a single argument, named dut in this instance. The term dut stands for “Device Under Test” and signifies the instantiated module (AdderNBits in this case) within the simulation environment.
- dut.io.a.poke(a): Using the poke function (relevant only in the test environment), we simulate the scenario where dut.io.a assumes the value of the integer a, as determined by the Scala for loop.
- dut.clock.step(): After assigning the desired inputs, the step() function signals the simulator to progress by one clock cycle. To better understand, envision that the simulation time remains static between two calls of the step() function. Even if I employ poke(a) prior to poke(b) in the code, within the simulation time frame, dut.io.a and dut.io.b attain their respective values simultaneously.
- val result = dut.io.sum.peekInt(): Following the advancement of the simulation by one clock cycle, we ‘peek’ the value of dut.io.sum. It’s expected to have calculated the sum of a and b. The subsequent role of the assert function is to verify this.
- assert(result == a+b): Instead of manually inspecting every clock cycle of your simulation for discrepancies, you can automate your tests using assert. The assert function receives a boolean as an argument. If it’s true (meaning the result matches a+b), nothing happens. However, if the result diverges from a+b, then the assert function flags an error, halting the test, and notifies you.
This is a fundamental testbench designed to assist you in executing your first testbench with Chisel. This testbench can undoubtedly be enhanced – for instance, by crafting functions (redirecting the print to a log function, employing a log library), or by designing a TestFactory to generate your tests rather than using a for loop. I’m saving these advanced features for a subsequent article, likely when we delve into Cocotb.
To look at your waveform, install GTKvawe and type this is your terminal:
gtkwave build/artifacts/test/Adder4Bit_should_correctly_add_two_4bit_numbers/AdderNBits.vcd In this case you will look at the 4bits adders results.
Conclusion
To summarize, we’ve journeyed through the basics Chisel testbenches. Remember, the heart of design isn’t just in crafting impeccable circuits but in verifying them with precision. By now, you should be well-acquainted with foundational testbench concepts, from poking and peeking to the assert function. While today’s insights offer a solid starting point, the realm of testing in digital circuit is vast, and we’ve only just scraped the surface. Keep your spirits high and stay tuned! In upcoming articles, we’ll dive deeper, exploring advanced tools and methods. We will continue our test journey with cocotb, since it is made for test and is more versatile. So, gear up, keep experimenting, and, as always, happy designing! 😄
I am preparing a course, do not hesitate to fill out the form, so that I do the training that you will like !